Tutorial Part 2
In this part of the tutorial, we'll explore one way to take the raw weather data and display it in a HTML interface.
Contents
Goal
This part of the tutorial is intended to:
- Embed external scripts
- Display dynamic data using jQuery and Mustache templating
Adding external libraries
Goal: Embedding jQuery and Mustache libraries
jQuery provides a lot of helpful functionality, and in order to display the forecast information we will use Mustache Templates.
Download the jQuery and Mustache from their project pages and save them in the js directory.
To use these libraries in your app simply append the following script tags in the head of index.html before the js/weather.js script tag:
<script type="text/javascript" src="js/jquery.min.js"></script>
<script type="text/javascript" src="js/mustache.min.js"></script>
It's that simple. You can now access jQuery using "$" or "jQuery" inside index.html and weather.js.
Displaying the Data
Goal: Displaying dynamic data
Using Mustache, it is quite simple to display the data.
Note
To prevent attempts to parse Mustache or other templates as HTML, we recommend wrapping them in script tags with custom type attributes
- Open index.html
- Remove "Weather forecast here." from the body tag
- Append to the body tag a Mustache template to represent the forecast information:
<script type="x-mustache-template" id="forecast_information_tmpl">
    <h1>Forecast for {{display_location.full}}</h1>
    <p>{{observation_time}}</p>
</script>
- Next we need a template to render the current conditions object:
<script type="x-mustache-template" id="current_conditions_tmpl">
<table>
<tr>
<td><img src="{{icon_url}}" /></td>
<td>
<div>{{weather}}</div>
<div>{{temp_f}}°F</div>
<div>Humidity: {{relative_humidity}}</div>
<div>Wind: {{wind_string}}</div>
</td>
</tr>
</table>
</script>
- And finally add a template for the daily forecast data. Here, we're using Mustache's Enumerable syntax to loop through a few days' conditions:
<script type="x-mustache-template" id="forecast_conditions_tmpl">
{{#forecastday}}
<td>
<h2>{{date.weekday_short}}</h2>
<img src="{{icon_url}}">
<div>{{conditions}}</div>
<div>Low: {{low.fahrenheit}}°F</div>
<div>High: {{high.fahrenheit}}°F</div>
</td>
{{/forecastday}}
</script>
- Next we need designated elements where the templated information will be appended. Add the following tags following the templates inside the body element:
<header id="forecast_information"></header>

<section id="current_conditions"></section>

<section id="forecast_conditions">
    <table>
        <tr>
        </tr>
    </table>
</section>
- Now open weather.js and add the following JavaScript code which will template and append the data:
function populateWeatherConditions (weather) {
    var tmpl, output;
    forge.logging.log("[populateWeatherConditions] beginning populating weather conditions");

    tmpl = $("#forecast_information_tmpl").html();
    output = Mustache.to_html(tmpl, weather.current_observation);
    $("#forecast_information").append(output);
    forge.logging.log("[populateWeatherConditions] finished populating forecast information");

    tmpl = $("#current_conditions_tmpl").html();
    output = Mustache.to_html(tmpl, weather.current_observation);
    $("#current_conditions").append(output);
    forge.logging.log("[populateWeatherConditions] finished populating current conditions");

    tmpl = $("#forecast_conditions_tmpl").html();
    output = Mustache.to_html(tmpl, weather.forecast.simpleforecast);
    $("#forecast_conditions table tr").append(output);
    forge.logging.log("[populateWeatherConditions] finished populating forecast conditions");

    forge.logging.log("[populateWeatherConditions] finished populating weather conditions");
};
- Finally add a jQuery.ready listener inside weather.js which will kick things off when the page finishes loading:
$(function () {
    populateWeatherConditions(weather);
});
Important
Any code that modifies the page should only be run when the page is finished loading. The above achieves this using jQuery's document ready listener $(function () { /* code here */ }).
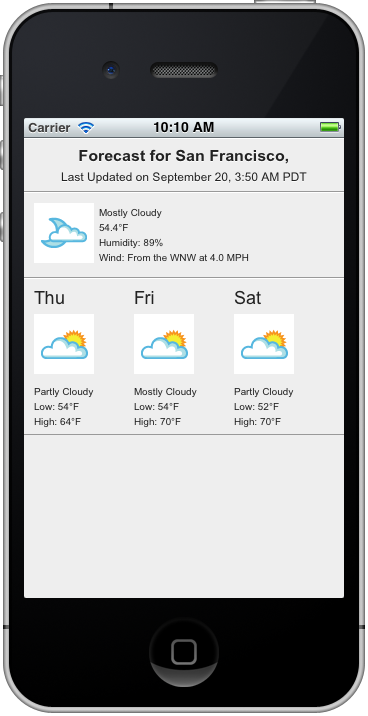
(Mobile Only) Build the code and run the app and you should see the dummy weather forecast displayed automatically.
(Chrome Only) Build the code and reload the extension. When you click on the toolbar button you should see the weather forecast displayed in a pop-up window.
Adding CSS
You can make the display a bit more pleasant by adding some custom CSS. Create a css directory and download style.css into it. Link this file in the head element of index.html to add some basic styling to the Weather App:
<link rel="stylesheet" type="text/css" href="css/style.css">
At this point, your app should display static weather data for San Francisco, CA when it is opened.
Reference app
See the part-2 tag in the Github repository for a reference app for this stage of the tutorial.
What next?
Continue on to Tutorial Part 3!